Friday, May 15, 2020

Cold-Process Coconut Oil Soap

I love this recipe! It took a bit longer and it will have to cure 4-6 weeks but it is beautifully white and I'm told it will make a super sudsy very hard bar of soap.

16.5 oz coconut oil
2.4 oz lye
4.8 oz distilled water

 Mix water and lye to dissolve. Let cool to about 110 degrees.

While the lye solution is cooling, melt the coconut oil in crock pot on low heat.  (Don't let it get over 100 degrees). Turn off crock pot.

Slowly pour lye solution into oil and blend until well mixed.

Add essential oils, if wanted.

Mix to light trace.

Stir in any additions, if wanted.

Pour into mold lined with parchment paper.

Cool and let harden for 12-18 hours. Remove from molds and cut into bars.

Let sit in a cool, dry place for 4-6 weeks to cure.


Monday, April 20, 2020

Youth Group Online

During this time of social distancing and virtual/online everything, here are some ideas to do with your youth group or kids' and their friends online. These ideas work best in Zoom but you could do some of them on other online platforms... Have fun!

 Get to Know You Activities:

1. Two Truths & A Lie: Each player thinks of 2 things that are true about themselves and one that isn't true. Everyone else has to guess which one is the lie.
2. Show n Tell: Have kids bring something to show and tell the other kids about. Just like in kindergarten...
3. Have You Ever?-Quarantine Edition: Come up with a list of things that kids may be doing while home on quarantine (read a book, stayed up all night, cooked a meal...). Everyone holds up 10 fingers and puts one down for each thing they've done while on quarantine. The first one with all ten fingers down wins.
4. Would You Rather?: Come up with a list of "would you rather" questions or Google search some for kids. Ask each player a question (or more) or see how everyone in the group would answer the question.
5. Talent Show: Have each kid show off a talent they have. You can limit their time if you want.


Weekly Challenge Activities:  The kids can start off your meeting time with showing pictures or videos of their challenges. It helps if they can send them to the host before the meeting so they can get embedded into the Zoom room.

1. 10 Item Tower Challenge: Using 10 (or more) different items from around the house, build a free-standing tower from the floor to the ceiling. Then take a picture of the tower and one of you standing next to it. This is a good challenge for the whole family to help with.
2. Fork House: Make a small house entirely out of forks (and only forks). You can use metal or plastic forks.
3. Race Car: Build a car from a toilet paper roll and any other materials of your choice. It must be able to travel across a hard-surfaced floor on its own (no guiding it along the floor with your hand).
4. Book Head: Video yourself walking all the way around your house with a book balanced on your head. The person who can go the furthest without letting the book falls is the winner. Also a good way to see other people's houses.
5. Pen Art: Take a whole bunch of various pencils, pens and/or markers and use them to make a picture without drawing with them. Use the actual pens, pencils and markers to make the picture.
6. Random Poem: Take 10 different books. Write the first word on page 10 that is more than 4 letters from each book on a piece of paper. Use those words (and others of your choice) to write a poem. Everyone reads their poem out loud to the group at the next meeting.

Games:

1.Scavenger Hunt: Come up with a list of general items for players to find around the house (something you drink, something from the bathroom, something fuzzy, something that starts with the letter B, something from the kitchen...). Players must bring the item back to their phone/computer (no taking the camera with you). All players show their items. Points are awarded to the players that have items that no one else has. (If more than one player brings milk for something to drink, none of those players get a point.)
2. Hangman: Using the whiteboard, play a game of hangman. The host will need to draw the hangman and the letters chosen.
3. Pictionary: Let each player have a turn drawing something on the whiteboard, letting the other players guess what it is. You can let each player choose their own word or give them a word to draw either in private chat or in the waiting room.
4. Charades: Let each player have a turn acting out a word or phrase, letting the other players guess what it is. You can let each player choose their own word or phrase or give them one to act out in private chat or in the waiting room.
5. Trivia: Choose some trivia questions and put them into a slideshow. You can also find some already made for kids/youth online to import in.
6. Who Am I?: Put one player out of the room into a waiting room. Then tell the rest of the players a famous person assigned to the missing player. Then bring the guessing player back into the room. They have to ask 20 yes or no questions to help them guess who they are. You can give the guesser a hint if you want or need to.
7. The Price is Right Hi-Lo Game: Show the picture of some random items from Amazon with a price you have made up. Give players 3 seconds to guess if they think that price is too high or too low. (You don't want to give them enough time to look up the item.) Then reveal the true price and give points to the players that guessed correctly.
8. Escape Room: There are lots of options for online virtual escape room games you can do as a group.


Tuesday, February 11, 2020

Doors Off!

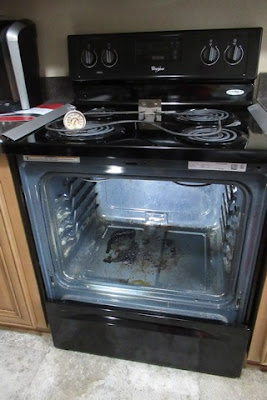
Last week I made cinnamon rolls as a special treat for breakfast. They were special until smoke began pouring out of the back burner on the stove. I guess springform pans aren't tight enough to keep butter and sugar inside the pan. It all leaked out onto the bottom of my oven... :/

The cinnamon rolls baked up perfectly! Unfortunately the bottom of my oven was less than perfect.


But a friend came over for lunch and suggested that taking the door off the oven would make the job so much easier! 

She was right! My sweet hubby not only took the door off but also removed the element when I asked. 


When there is no door and no element, nothing gets in the way of you really getting in there to clean. :) 

Despite the horrible burned-on mess, I just couldn't bring myself to use some toxic spray in my oven where I cook things we eat. So I went with elbow grease and sharp metal objects, along with a bucket of hot water and lots of paper towels.


And although I'm sure Whirlpool wouldn't approve of my methods, they worked great! And now my oven is clean! 


By the way... those scrubby metal things also work really well for cleaning the racks in the bathtub. :) 

Wednesday, August 21, 2019

Fun & Fancy Composition Books

Here's a creative and easy way to make those boring black and white composition books pretty and fun! I use them for my morning Scripture journals or travel journals, but you could use them for anything...

First, pick out some coordinating papers for the front and back covers. I also pick some to go under the Bible verses or quotes I put on the front.


1. Lay the cover open on top of the corner edge of the back side of your cover paper and mark the bottom edge with a pencil and the side edge halfway through the black tape seam.


2. Cut it out with scissors or paper cutter. Round edge corners and glue onto cover.


3. You can add mini brads to corners and washi tape to the seam to help it stay anchored.


Add any embellishments you want to the front.


If you want to add a ribbon bookmark, cut a length of coordinating ribbon. Staple and tape to the back cover.


I put some tape over the staple inside

Then repeat steps 1-3 with the back cover.


There are so many ways you can make these unique to your personality or purpose.


Tuesday, July 23, 2019

Safe & Easy Cleaning: Or “Cleaning For Germophobe Lazy People”: Part Two


The first thing I noticed about the E-cloths is that I hate the way the microfiber feels when they are dry. Thankfully, you use them wet for the most part so it isn’t an issue for me. 

Here’s how you use all of the cloths that are to be used wet…

Just get it wet in hot water, ring it out and use. Because it is really thick, you can really scrub if you need to. I found I didn’t need to scrub much at all. When it gets dirty or after you’ve wiped a few things, rinse it well in hot water, ring it out and start again. Give it one final rinse and ring before hanging it to dry.

General Purpose Cloth: walls, doors, door handles, windowsills, tables, light switches, outlets, dining rooms chairs…


It worked great! I was especially impressed how it cleaned the smudges and smears on the walls and doors and windowsills. The only thing it didn’t take off was the crayon (but that’s why they make Magic Erasers).
Kitchen Cloth:  counters, fridge, cabinets, inside drawers, dishwasher, fridge, microwave,small appliances…


I like this one because one corner has a rough scrubby thing on it. This is good for things like when you drip pancake batter on the counter and then just ignore it for a while until it’s good and dry and stuck on there.

After weeks of being used and not cleaned, it looked amazing when I was done!

Bathroom Cloth: sink, counters, cabinets, shower/tub, toilets (I know)…


My sinks were sparkling and the shower and tub cleaned up nicely, too.

Stainless Steel Cloth: any stainless sinks or appliances or fixtures.


This one is two-sided. The striped side has rough scrubbies and the other side is just microfiber.
My kitchen sink looked so clean and shiny with no greasy residue left behind.  Wow!


Range/Stovetop Cloth:  range, stovetop, drip pans…


Like the stainless cloth, this one also has scrubbing stripes on one side and microfiber on the other.
I use the microfiber side first to clean the front of the oven door and then the handles. Then I used lots of hot rinses and the scrubby side for the greasy stovetop. It even cleaned out the burned on bits from my drip pans.

before/after

Windows/Glass Cloth: windows, mirrors, glass tabletops, glass doors…


This isn’t microfiber but is a sort of heavy waffled cloth. Use it the same way as the microfiber ones. You only need to use this if the surface is really dirty.
I couldn’t wait to try this one! The windows weren’t awful but the sliding glass door was awful: smudgy  handprints and wants-to-go –out-or-come-in dog nose prints. Because I was doing both the inside and outside windows, I filled a bucket with hot water to use for rinsing and re-wetting the cloth while outside.  Just don’t ring it out over the bucket.


The true magic of the window/glass cloth is in the polishing cloth…

Glass/Polishing Cloth: glass, stainless, chrome, tv or computer screens…


This is a lightweight cloth that is used dry for polishing any glossy surface to a gorgeous shine.  You can use it on its own if the surface isn’t truly dirty: like all those disgusting splatters on the bathroom mirror from flossing will probably come off just fine with this one. Just kidding… who flosses???
Without a doubt, this one is my favorite! My chrome cookie jar and canisters have a mirror-like finish! The kitchen sink, any glass surface and the stove shop are positively sparkling!


Dust Cloth: any surface that needs dusting…


This one is also a dry use cloth. 
Either this is the least dusty house we’ve ever lived in (and we’ve lived in 16 houses in 5 states, so I doubt it) or what they say is true about most dust cloths just swirling it around so it can resettle right back where it came from. Even after two weeks, most surfaces in the house still looked pretty darn good, which is great because I hate dusting! This is probably because I don’t live in Marie Kondo’s house. I’m more kitschy than minimalist.

Deep Clean Mop (Wet & Dry): any hard floor surface…


The mop heads easily attach with Velcro to the handle system.. First use the dry one followed by the wet one to clean. Prep the wet one just as you would any other microfiber cloth.

I almost didn’t get this one. I’m not really into mopping floors but we have a dog. These floors hide everything! They really never look dirty at all. Max does a pretty good job of taking care of any food that might make it down there. Until the dog hair really starts to pile up in little tumbleweeds all over the place, I can completely ignore the floors.


Long black dog hair is the bane of my existence and why I was so excited that our new house doesn’t have much carpet or stairs. In case you don’t know what “bane of my existence” means, it means that I’d rather have Bane the super-strong, mask-wearing Batman villain all over my house than dog hair. At least he could possibly prove to be useful around the house, like when I wanted to clean behind the stove or under the fridge. LOL  I’m so silly. I don’t clean there until I paint or we have to move.
Ok, sorry. I got sidetracked…

Unlike my old Swiffer mop thing, this is much larger and just glides easily everywhere that stupid hair hides. Sorry. It picks up dry like a champ. What I’m not wild about is what to do with the giant pile of grossness that it collects.  Right now, I use the hose on my vacuum to suck up the pile and to clean off whatever sticks to the dry mop head. It works.


Auto Care: the outside of your car or truck or van or motorcycle or scooter or boat…


This comes with a double-side cleaning mitt (use wet), a dry & shine cloth and a glass & chrome cloth (use these dry).

While they had proved to work great in the house, I was way more skeptical about how it would clean my car and truck with no soap. Side note: I’m also a bit fanatical about having clean vehicles…
I used the hot water bucket method I used when washing the windows of the house outside. Once again, don’t ring out the washing mitt over the bucket. Depending on the size of the bucket and how dirty your car or truck is, you may have to fill the bucket more than once. If the water on the surface is still dirty, rinse, ring and wipe again.

Then dry it with the dry & shine cloth. I found on the initial pass over it left quite a bit of lint. But when the surface was dryer, it got better. Then polish up any shiny bits, including the windows and side mirros with the glass & chrome cloth.

I also would recommend using the general purpose cloth, dusting cloth, and window/polishing cloth from the house on the interior.

White cars are forgiving but our midnight blue one is not. Both the truck and the car were sparkling clean inside and out when I was done!


I am so impressed that I am buying one for my kids who live in apartments, where it’s impossible to wash your car with a bucket of soapy water and a hose. I know my oldest son and his wife will use it. My younger two… I’m going to pretend I’m optimistic and do it anyway. It makes a good gift for the young adult child who doesn’t really need anything and only has expensive electronics on their Amazon wish list.

Laundering the Cloths:

I had to do a bit more research on how often to launder these things. Regularly just wasn’t precise enough. I determined that after my week of housecleaning (see my post on my house cleaning schedule PART 1 & PART 2) they should get thrown in the washer.

Just follow the washing instructions that come with them. Despite what they say, my research said to let them drip dry for best performance. They dry really fast, so it’s not a big deal.


Sorry this got so long.  If you made it this far, thanks for bearing with me.  All this is to say, if you’re curious,  give it a try.  It’s easy and better for you, your family and our planet.


Safe & Easy Cleaning: Or “Cleaning For Germophobic Lazy People”: Part One


When we successfully launched our three sons into adulthood I suddenly lost my labor force. And unlike my previous and hopeful assumptions, the house still got dirty even after they all moved out. Not only did I still have to clean but I had to do it on my own.

Before I get a ton of comments, of “what about your husband?” I should explain that he works two full-time jobs,  does tons of stuff around the house and is our official dish washer. I HATE washing dishes! It’s how we’ve done it for nearly 27 years now and it works just fine for us. Thanks for your concern though.

Back to my original point of needing something easy and chemical free…

In 2008 I decided to make some changes to our house cleaning to make it more earth and people conscious. (You can read my original post about it HERE.) Our boys had been helping me with chores around the house since they were 3 or 4 years old. But I became concerned about all those chemicals we were using. All of a sudden I was more aware of that lightheaded “high” you feel when trapped in a bathroom with a cocktail of Windex, Comet and 409 fumes. So I started making my own cleaners and using washable rags. (Posts about that and recipes are HERE & HERE) And they worked just fine, but it wasn’t ideal.  After the boys were gone I was no longer doing laundry all the time for washing rags and, to be perfectly honest, I just got sick of making stuff.  Ok, I’ll just say it… I got lazy.  


To be really honest, I got so lazy that I started buying those Lysol cleaning wipes. Eventually I started noticing that “cleaner high” again. I had to find an alternative. But then life got crazy busy. My husband got a new job and we had to move.  I forgot how much work it is to sell and buy a house at the same time. After all it had been 17 years since that last time we’d done it. Now it wasn’t simply about being lazy, I needed something FAST!

Once we got all unpacked in the new place, I decided to try purchasing more eco-friendly cleaning products. Those things either don’t work that great, you still have to wash and store a whole lot of rags and are just darn spendy.

Then I did some unbiased, real-life women, blog/YouTube research on those microfiber rags that only needed water.  I figured they were just too good to be true. Getting rid of dirt, grease and germs only using water?

Confession time: I am a bit of a germ freak. My children and husband would argue the “bit” part. So I did my due diligence on their claims. Turns out, as far as I could tell, I could be wrong.  But since I am pretty  paranoid, I still use Lysol wipes on the toilets and to clean up raw meat spills. I know… I know…

I ordered a starter pack of E-cloths and gave them a whirl…


Even more confession time: The first time I used these things, I gave them a run for their money. In the whirlwind of painting, unpacking and trying to find time to eat and sleep, cleaning got moved to an embarrassingly low place to my list of things to do. By the time I actually got to it, the house was pretty bad.  Either they were going to be the answer to my easy-cleaning prayers or I was going to make go out and buy a Costco pack of cleaning wipes and try again.

Tuesday, July 16, 2019

Clear & Shiny Shower Doors

The first time I cleaned our new glass shower doors, I mixed up a paste of baking soda and water and set out to tackle the soap scum built up on them. I followed it up with a sudsy vinegar spray rinse, let it sit for a couple of hours and rinsed it with water. The water flowing down the doors looked so clear and bright. And then I took the window squeegee to them and they were all smudgy again...

Not to be deterred, I did it again the next cleaning day. More baking soda, vinegar and lots of scrubbing. It was a bit better, but not great. Obviously using the window squeegee every day just wasn't really making a difference.

Then my husband suggested that it was probably not soap scum but hard water stains. Of course! How could I be so stupid???  I got back on the trusty internet to look up my new solution: baking soda paste, vinegar and lemon juice...

Nope.

Razor blades...

Nope.

Then I broke down and started researching less "safe and natural" solutions. The bottle of CLR (Calcium Lime Rust remover) in the garage seemed like the perfect answer. I even contacted the company directly to find out the best way to clean hard water stains off glass shower doors. At the end of a lengthy email warning of correct dilution methods, and warnings of contact on non-glass surfaces there was a disclaimer. 

Note:  Due to the natural density and hardness of calcium as a mineral, if you are unable to scrape any residue off topically using a fingernail or razor blade, the calcium can actually etch the glass and embed itself into the material of the glass.  If this has happened, there is no remedy for this.

Whatever... I was sure this was going to work. I donned my rubber gloves, correctly diluted the solution and set off with my sponge and kitchen timer (they warned me to not leave it on the glass any longer than 2 minutes or let it touch any metal). With those kinds of warnings, it had to work. Right?

Nope...

Nothing.


I went back and read the email again... "If this has happened, there is no remedy for this."

I know it's silly. But I just couldn't accept that there was nothing I could do to bring them back to their former glory. After all, they are only four years old. They're practically new.

No! There had to be something...

I got back on the internet and found this website. Mary had the solution to my problem. 

Sandpaper. Yup sandpaper. The kind of sandpaper that they use when doing auto body work. The kind you have to use with water. The kind of sandpaper that is so fine (3000-7000 grit), it feels like just plain old paper. The kind you can't buy in the store but have to order HERE on Amazon. 


I ordered some immediately and felt like a kid waiting for Santa to come on Christmas Eve for two days.

This job requires you to be in the shower and to use a lot of water. I can't imagine doing it without a removable shower head that you can use to spray down your doors often. You will get wet.

Cut the sandpaper sheets into quarters. This makes for a much easier size to work with. 


Start with the piece of 3000 grit. Wet both the piece of sandpaper and the shower door down very well. You want everything really wet. Then scrub in a circular motion from the top to the bottom. Rinse, squeegee, and dry with a lint-free cloth. 

You will now see where you missed. Don't worry. You will be repeating this process a few times. 

Now do the all the steps again (wet, rub in circles, squeegee, dry) with the 5000 grit piece.

Next you're going to use the 7000 grit. But no one warned me about what would happen with this ultra-smooth piece. 

You have to use a LOT of water for this one. In fact, just keep that shower spray nozzle on and in your other hand. It's going to sort of goop up and make a dark gray rubbing compound on the glass, your hand and anywhere you lay it down once it's wet. But you still use the same process  (wet, rub in circles, squeegee, dry). 

At this point, I could tell it was working... (I only did one tiny section at first)


I just kept repeating that 3-step process until it was clear again.


I was afraid on one would believe it worked that well, so I took another one with the door half open...


Now, it's not perfect. But it is so much better that when my husband went in to brush his teeth before bed, he walked over to shut the shower door. But it was already shut... Yeah, baby! 


Oh... I almost forgot. I also used the 7000 grit piece when I was done with the doors, on the handle inside...


Just as a reminder... Before:


After...


Notice how you can actually see what things in the bathroom are now. :) 

Thank you, Everyday Cheapskate. You're my hero!