Showing posts with label crafts. Show all posts

Wednesday, August 21, 2019

Fun & Fancy Composition Books

Here's a creative and easy way to make those boring black and white composition books pretty and fun! I use them for my morning Scripture journals or travel journals, but you could use them for anything...

First, pick out some coordinating papers for the front and back covers. I also pick some to go under the Bible verses or quotes I put on the front.


1. Lay the cover open on top of the corner edge of the back side of your cover paper and mark the bottom edge with a pencil and the side edge halfway through the black tape seam.


2. Cut it out with scissors or paper cutter. Round edge corners and glue onto cover.


3. You can add mini brads to corners and washi tape to the seam to help it stay anchored.


Add any embellishments you want to the front.


If you want to add a ribbon bookmark, cut a length of coordinating ribbon. Staple and tape to the back cover.


I put some tape over the staple inside

Then repeat steps 1-3 with the back cover.


There are so many ways you can make these unique to your personality or purpose.


Tuesday, May 7, 2013

Seed Album

I found an idea for organizing seed packets in a mini album on One Hundred Dollars a Month.  It was such a fantastic idea that I ran up to the store and bought one right away!

But I really didn’t like the blue glitter. I took out the front and back panels and made new ones out of totally adorable farm scrapbook paper. Much better!

seed book - The Backyard Farmwife I added my garden plans to the first page…

seed book - The Backyard FarmwifeThen I added general when/where of planting sections…

seed book - The Backyard FarmwifeIt’s pretty fat with all of the seeds still in the packets, but it will thin out once everything is planted…

seed book - The Backyard FarmwifeI will still have all of my planting/thinning/harvesting directions. But best of all, I will be able to remember what I planted this year for next year and can slip in notes about what I thought/learned about each one. I always think I’ll remember but never do…

Tuesday, February 26, 2013

Egg Carton Art

After we got chickens, my super talented sister painted me this egg carton…

egg carton - The Backyard Farmwife It was too cute to use! But after all this time of just admiring it I realized it was just too cute not to use!

I turned to my handy-dandy scanner/printer. What would I do without that thing??? I scanned a copy of it. Put in into a Word doc, made it 3” tall and 10.25” across. Copied a second one and saved it.

Then I printed it onto 8 1/2 X 11” label paper. You can buy it on Ebay HERE.

egg carton - The Backyard FarmwifeAll I had to do was cut them out and stick them on top of new blank egg cartons I bought at the feed store for 40 cents each.

egg carton - The Backyard Farmwifeegg carton - The Backyard FarmwifeThe hardest part was getting the back off the sticker without ruining it! ;o)

egg carton - The Backyard FarmwifeI simply love the way they turned out! Now I have two for my fridge and two for my sweet friend who buys my eggs every month!

egg carton - The Backyard Farmwife

Friday, December 28, 2012

What I Gave For Christmas

This year I made a few gifts.  Some turned out great, others… well. Some were very simple and some were not. But I love giving handmade gifts! It’s so rewarding to know you made something that the recipient will love!

homemade gifts 01 Cocoa snowmen hostess gifts

homemade gifts 02

glitter animal ornaments

homemade gifts 03

Ladybug tea wreath

homemade gifts 04

clip-on earring frame

homemade gifts 05

spiced cider (mulling spices, handmade cider and tea infuser)

homemade gifts 07

bacon popcorn cans (directions HERE)

hawaii quilt 02

our Hawaii quilt for my hubby

But my favorite handmade gift I gave this year was the fox stole I made for my sister! Now I want one!!!

homemade gifts 09 homemade gifts 08This pattern I found on Pinterest from Prudent Baby.

Did you give or receive any handmade gifts this Christmas???

Wednesday, July 11, 2012

Fancy Boots Makeover

When I found these boots at The Bins (aka Goodwill Outlet) almost 2 years ago, I was so excited! They were just was this farmer needed to feel pretty while out working in the garden or mucking out chicken poop!

duct tape boots - The Backyard Farmwife

But after nearly 2 years of real work, they don’t look nearly so snazzy. In fact they look kinda sad, tired and worn out.

duct tape boots - The Backyard FarmwifeSo I decided it was time for a  makeover. I found a pair of boots that someone covered with duct tape and looked so cute and fun, I decided to give it a try. Honestly, I probably could have bought a new pair of cute used boots for the price of all that fancy tape. But it wouldn’t have been nearly as crafty and I wouldn’t have gotten to finish them all in one sitting if I hadn’t been watching “27 Dresses” completely uninterrupted (yes, it did take that long to completely cover both boots with little strips of tape). Teenage boys leave you alone when they know you’re watching a chick flick in the other room. ;o)

duct tape boots - The Backyard Farmwifeduct tape boots - The Backyard FarmwifeWe’ll see how they hold up to the test of real farm work, but they do look super cute on my feet and sitting by our back door!

duct tape boots - The Backyard Farmwife

Friday, April 29, 2011

Drinking Jar

I LOVE my new drinking jar! It’s practical, unique and oh-so-country-cute!

drinking jar 03All you need for this project is a wide-mouth canning jar and a grommet punch. Oh, and a drill with some really BIG bits! (I used a 1/2” bit for my grommet hole)

I drilled two holes in my jar lid, one small and one large. But I think it would still work with just the larger hole for the straw.

drinking jar 01I would have taken pics of the drilling process but it wasn’t pretty and I’m sure any one of you could come up with something a little more efficient.

Then you just use your grommet punch set to attach the grommets in the lid.

My 1 1/2 pint-sized jars are my favorite for this but  any wide-mouth jar would work. You could even do a half-gallon Super Big Gulp jar, but you’d have to acquire MUCH longer straws! :o)

drinking jar 02I love the way it looks with fresh strawberry lemonade in it! (I was enjoying it too much to take a picture of it! Maybe I’ll take one next time…)

Wednesday, March 23, 2011

Kitchen Curtain

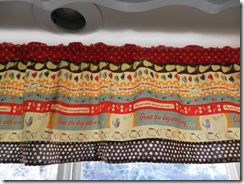
I bought this adorable fabric a while back when we were vacationing at Cannon Beach.

curtains 02

I finally decided they would make charming curtains for the kitchen.

curtains 01  I was right! It gives the kitchen window a warmer look. I also love the cheery and encouraging phrases… “Greet the day with a song!”  “Hey good lookin’ what you got cookin’?” and my favorite “If we were meant to pop out of bed, we’d all sleep in toasters.” :o)

 curtains 03 Now I have to decide what to do with the fabric I have left???

Wednesday, March 9, 2011

Dish Crafts

Somehow despite my aversion to washing dishes by hand, I seem to have gotten myself in a pickle. My new pots and my new favorite dishes are BOTH hand wash only! I now find myself with dishpan hands (no, I don’t use Palmolive…), and a perpetual stack of drying dishes on my counter. Hence, I also have a perpetual puddle of water on my counter.

I could use a dish rack but they are so bulky and unattractive and take up a bunch of space in a cupboard or on the counter. So I had to come up with a solution that was both practical and cute…

I had just the thing in my stash! A set of very fun vintage prints from my friend Becky (yes, the one who made my new kitchen quilt). And with a couple of bathroom hand towels that I never use, I soon had exactly what I needed! (and some bonus items, too)

kitchen crafts 03Two dish drying towels and two coordinating appliquéd tea towels.

  kitchen crafts 05

I love the binding with the ric rac accent!

kitchen crafts 04

I also took the remaining fabric and made a matching apron! I am so trying to get into the habit of wearing an apron while working in the kitchen. It’s both stylish and practical…

kitchen crafts 02kitchen crafts 01 You can’t see them in the picture, but there are two little pleats in the center of the apron.

I’ve been using the towels to dry dishes on for a few days now and they work great! All I do is hang them to dry after I put the dishes away and they are all ready for the next load…

dishes 01I’m saving the cute one for when we have company! :o)